How To Refinish A Kitchen Table With Chalk Paint
Refinishing a kitchen table can breathe new life into a central piece of furniture and dramatically alter the aesthetic of a kitchen. Chalk paint offers an accessible and forgiving medium for achieving a variety of looks, from rustic and distressed to smooth and modern. This article provides a comprehensive guide on how to refinish a kitchen table using chalk paint, detailing each step required to successfully transform the table. The process involves careful preparation, application, and finishing techniques to ensure a professional and durable result.
Understanding Chalk Paint
Chalk paint is a decorative paint known for its matte finish and exceptional adhesion. Unlike traditional paints, chalk paint often requires minimal surface preparation, making it appealing for DIY projects. Its composition typically includes pigments, binders, and fillers that create a highly porous surface ideal for layering and distressing. The matte finish provides a unique texture and allows for easy manipulation of color and depth. Furthermore, chalk paint is water-based, making it low in volatile organic compounds (VOCs) and relatively easy to clean up. However, due to its porous nature, chalk paint requires a sealant, such as wax or a water-based topcoat, to protect the finish from stains and wear.
Materials and Tools Required
Before commencing the project, ensure all necessary materials and tools are readily available. The following list provides a comprehensive overview:
*Chalk Paint:
Select a chalk paint in the desired color. The amount needed will depend on the size of the table and the number of coats applied. *Primer (Optional):
While chalk paint often adheres well to most surfaces, a primer may be necessary for glossy or previously varnished tables to ensure optimal adhesion and prevent bleed-through of stains. *Wax or Water-Based Topcoat:
A sealant is crucial to protect the chalk paint finish. Wax provides a soft, matte finish and enhances the distressed look, while a water-based topcoat offers greater durability and stain resistance. *Paintbrushes:
Use high-quality paintbrushes designed for chalk paint. Synthetic bristle brushes are generally preferred for their smooth application and durability. *Sandpaper:
A variety of sandpaper grits are needed for surface preparation and distressing. 120-grit sandpaper is suitable for removing existing finishes, while 220-grit and 320-grit sandpapers are ideal for smoothing surfaces and creating a distressed effect. *Drop Cloths or Plastic Sheeting:
Protect the work area from paint spills and dust. *Painter's Tape:
Use painter's tape to mask off areas that should not be painted. *Cleaning Supplies:
Include a degreaser, soap, water, and clean cloths for surface preparation. *Putty Knife (Optional):
For filling any imperfections like cracks or dents. *Wood Filler (Optional):
For significant repairs of damaged areas. *Lint-Free Cloths:
Essential for applying wax or topcoat. *Wax Brush (Optional):
A specialized brush for applying wax. *Electric Sander (Optional):
Can speed up the sanding process, especially for larger tables. *Respirator or Dust Mask:
Protection from dust and paint fumes. *Gloves:
Protect hands during the entire process.Step-by-Step Refinishing Process
The refinishing process involves several key steps, each requiring careful attention to detail for optimal results.
1. Surface Preparation:
Begin by thoroughly cleaning the kitchen table. Remove any existing dirt, grease, or debris using a degreaser and a clean cloth. If the table has a glossy finish or varnish, lightly sand the surface with 120-grit sandpaper to create a better surface for the primer or chalk paint to adhere. Fill any cracks or dents with wood filler, allowing it to dry completely before sanding smooth with 220-grit sandpaper. Wipe the surface clean with a damp cloth to remove any sanding dust.2. Priming (Optional):
If the table is made of a material that is prone to staining or has a particularly glossy surface, apply a thin, even coat of primer. Allow the primer to dry completely according to the manufacturer's instructions. Lightly sand the primed surface with 220-grit sandpaper to create a smooth base for the chalk paint.3. Applying Chalk Paint:
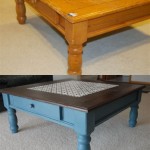
Stir the chalk paint thoroughly before use. Apply the chalk paint in thin, even coats using a high-quality paintbrush. Work in the direction of the wood grain, if applicable. Allow each coat to dry completely before applying the next. Depending on the desired coverage and aesthetic, two to three coats may be necessary. The first coat often appears uneven, but subsequent coats will provide a more uniform finish. If brush strokes are noticeable, lightly sand the surface with 320-grit sandpaper between coats to smooth them out.4. Distressing (Optional):
After the chalk paint has completely dried, the distressing process can begin. Distressing involves intentionally removing small amounts of paint to reveal the underlying wood or previous layers of paint, creating a worn and aged look. Use 220-grit sandpaper to gently sand the edges, corners, and any areas that would naturally experience wear and tear. Consider focusing on areas like the table legs, edges of the tabletop, and any decorative details. The amount of distressing is a matter of personal preference. For a more subtle effect, use fine-grit sandpaper and apply light pressure. Wipe away any sanding dust with a clean cloth.5. Sealing:
Sealing the chalk paint is essential to protect the finish from damage and staining. Choose either wax or a water-based topcoat, depending on the desired look and level of durability. *Wax Application:
Apply a thin layer of wax with a wax brush or a lint-free cloth, working in small sections. Use a circular motion to ensure even coverage. Allow the wax to penetrate the chalk paint for a few minutes, then buff the surface with a clean, lint-free cloth to remove excess wax and create a smooth, polished finish. Multiple coats of wax may be applied for added protection, with each coat being buffed after application. *Water-Based Topcoat Application:
Apply a thin, even coat of water-based topcoat using a paintbrush. Work in the direction of the wood grain, if applicable. Allow the topcoat to dry completely according to the manufacturer's instructions. Lightly sand the surface with 320-grit sandpaper between coats to smooth out any imperfections. Apply two to three coats of topcoat for optimal durability.6. Curing:
Allow the sealed kitchen table to cure completely before using it. The curing time will vary depending on the type of sealant used. Wax typically requires a few days to fully harden, while water-based topcoats may take a week or more. Avoid placing heavy objects on the table during the curing process.Key Points for a Successful Refinishing Project
Surface Preparation is Paramount
The success of any refinishing project hinges on the thoroughness of surface preparation. Regardless of the paint used, a clean, smooth, and properly prepared surface ensures optimal adhesion and a flawless finish. Neglecting to clean the surface adequately can lead to poor paint adhesion, resulting in chipping and peeling. Failing to sand down existing finishes can also prevent the chalk paint from properly bonding to the table. Filling imperfections with wood filler not only improves the aesthetic appearance but also provides a stable and even surface for painting. Proper preparation might be time-consuming but is a critical investment in the longevity and appearance of the refinished table.
Application Technique Matters
The application of chalk paint, whether it be the initial coat or subsequent layers, significantly impacts the final outcome. Applying thin, even coats is crucial to avoid drips, runs, and uneven coverage. Using a high-quality brush designed for chalk paint ensures a smooth and consistent application. Working in the direction of the wood grain, if applicable, enhances the natural beauty of the wood and minimizes the appearance of brush strokes. Allowing each coat to dry completely before applying the next prevents the paint from becoming tacky and ensures proper adhesion. Sanding lightly between coats further enhances the smoothness of the finish.
Choosing the Right Sealant is Critical
The choice between wax and a water-based topcoat as a sealant is a crucial decision that depends on the desired aesthetic and level of durability. Wax provides a soft, matte finish and enhances the distressed look, making it ideal for creating a rustic or vintage aesthetic. However, wax requires regular maintenance and is less resistant to stains and water damage. A water-based topcoat, on the other hand, offers greater durability and stain resistance, making it suitable for high-traffic areas and households with children or pets. The application technique also differs between the two sealants. Wax requires buffing to remove excess and create a smooth finish, while a water-based topcoat requires multiple thin coats with light sanding between each layer. Selecting the appropriate sealant and applying it correctly is essential to protect the chalk paint finish and ensure the longevity of the refinished table.
By following these steps and paying careful attention to detail, anyone can successfully refinish a kitchen table with chalk paint and create a beautiful and durable piece of furniture.

How To Chalk Paint A Table Top Last

Gorgeous Chalk Paint Dining Table Makeover Diy Kindly Unspoken

How To Chalk Paint A Table And Chairs Confessions Of Serial Do It Yourselfer

Chalk Paint Table Makeover

A Kitchen Table That Pops Happiness Is Creating

How To Chalk Paint A Table And Chairs Confessions Of Serial Do It Yourselfer

Farm House Table Makeover With Gel Stain And Chalk Paint

How To Refinish Furniture With Chalk Paint A Mom S Take

A Table Restoration Refinishing With Chalk Paint

Refinishing Kitchen Table With Chalk Paint And Stain Prettydistressed
Related Posts