DIY Round End Table Ideas: A Comprehensive Guide
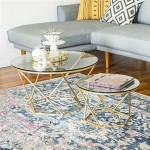
End tables serve a crucial functional and aesthetic purpose in any living space. They provide a convenient surface for lamps, drinks, books, and other essentials while also contributing to the overall décor. Round end tables, specifically, offer a softer, more approachable feel compared to their square or rectangular counterparts. The absence of sharp corners makes them ideal for smaller spaces and homes with young children. Constructing a round end table oneself allows for customization in terms of size, materials, and finish, resulting in a unique piece that complements individual style and existing furnishings. This article explores several DIY round end table ideas, providing detailed instructions and considerations for each project.
Repurposed Materials: Breathing New Life into Old Objects
One of the most rewarding aspects of DIY projects is the opportunity to repurpose materials, minimizing waste and creating something entirely new from discarded items. Many readily available materials can be transformed into stylish and functional round end tables.
Cable Spools: Empty cable spools, often discarded by construction or electrical companies, offer a sturdy and naturally round base for an end table. The size of the spool will dictate the table's dimensions. Begin by thoroughly cleaning the spool and sanding down any rough edges or splinters. The spool can then be painted, stained, or covered with fabric or other decorative materials. For added functionality, consider adding a round piece of glass or wood to the top of the spool, creating a smooth, even surface. This approach is particularly well-suited for rustic or industrial-style décor.
Wooden Crates: Stacked and arranged creatively, wooden crates can form a unique and modular round end table. Select crates of varying sizes and textures to add visual interest. Arrange the crates in a circular or semi-circular formation, securing them together with screws or wood glue. The open compartments of the crates provide built-in storage for books, magazines, or other small items. The crates can be left in their natural state for a rustic look, or painted or stained to match the existing décor.
Old Tires: While perhaps less conventional, old tires can be upcycled into surprisingly stylish round end tables. Clean the tire thoroughly and ensure it is completely dry. Wrap the tire with rope, twine, or fabric, securing it with adhesive. This creates a textured and visually appealing surface. A round piece of wood or glass can be placed on top of the wrapped tire to provide a stable and level surface. This option is particularly suitable for outdoor spaces or eclectic interiors.
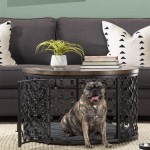
Drums or Barrels: Used drums or barrels, depending on their size and condition, can make unique and eye-catching round end tables. Cleaning and surface preparation are paramount. Rust removal and sanding are often required, followed by priming and painting or staining. Depending on the desired aesthetic, the drum or barrel can be left whole or cut in half to create a lower-profile table. Adding decorative elements, such as stencils or metal accents, can further enhance the table's visual appeal. Be cautious of sharp edges and ensure they are properly smoothed and sealed.
Constructed from Scratch: Tailoring the Table to Specific Needs
For those seeking complete control over the dimensions, materials, and design of their round end table, building it from scratch is an ideal option. This approach requires basic woodworking skills and tools, but it allows for unparalleled customization.
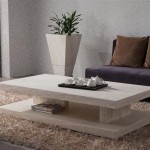
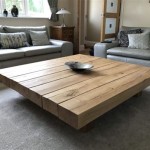
Simple Wooden Round Table: This project involves constructing a round tabletop and attaching it to a set of legs. The tabletop can be crafted from a single piece of plywood or multiple pieces of wood joined together. A jigsaw or router can be used to cut the wood into a perfect circle. Sand the edges smooth and apply a finish of choice, such as paint, stain, or varnish. The legs can be purchased pre-made or constructed from wood. Attach the legs to the underside of the tabletop using screws and wood glue, ensuring they are evenly spaced and provide adequate support. This approach offers a clean and minimalist aesthetic.
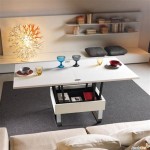
Round End Table with Storage: This project builds upon the basic round table design by incorporating a storage compartment beneath the tabletop. Construct a circular frame from wood to support the tabletop. Add a bottom panel to the frame, creating a closed compartment. A hinged or sliding door can be added to provide access to the storage space. This design is ideal for storing books, magazines, remote controls, or other small items. The exterior of the table can be finished to match the existing décor.
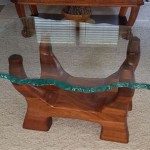
Resin Inlay Round Table: This project involves embedding decorative objects, such as shells, stones, or glass pieces, in a layer of epoxy resin on the tabletop. Construct a round mold using wood or plastic. Arrange the decorative objects within the mold. Pour a layer of epoxy resin over the objects, ensuring they are completely submerged. Allow the resin to cure completely, following the manufacturer's instructions. Sand the surface smooth and apply a clear topcoat to protect the resin. This technique results in a unique and visually stunning tabletop. Carefully consider the type of resin used, ensuring it is suitable for this application and provides a durable and long-lasting finish.
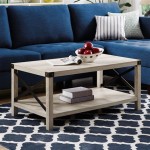
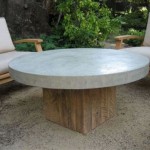
Metal Leg Round Table: Sourcing metal legs, pre-fabricated or custom-made, can provide a modern or industrial aesthetic for a round end table. Secure the chosen round tabletop, whether purchased or DIY, to the metal legs using appropriate fasteners. The resulting table offers a contrasting texture and design element, blending the warmth of wood with the sleekness of metal. The choice of metal finish (e.g., powder-coated black, brushed steel, polished brass) can significantly impact the overall style of the table.
Decorative Techniques: Personalizing the Finished Product
Once the basic construction of the round end table is complete, various decorative techniques can be employed to personalize the finished product and integrate it seamlessly into the existing décor. These techniques range from simple painting and staining to more elaborate methods such as decoupage and mosaic.
Painting and Staining: Painting and staining are the most common and straightforward methods for finishing a round end table. Choose colors and stains that complement the existing décor. Multiple coats of paint or stain may be necessary to achieve the desired color saturation and depth. Consider using a primer before painting to ensure proper adhesion and a smooth finish. Seal the painted or stained surface with a clear topcoat to protect it from scratches and spills.
Decoupage: Decoupage involves adhering paper cutouts or fabric scraps to the surface of the table, creating a collage-like effect. Choose images or patterns that reflect personal style and interests. Apply a layer of adhesive to the table surface and carefully position the cutouts. Smooth out any wrinkles or air bubbles. Once the adhesive is dry, apply several coats of varnish to seal and protect the decoupage. This technique is ideal for creating a whimsical and personalized end table.
Mosaic: Mosaic involves attaching small pieces of tile, glass, or other materials to the surface of the table, creating a decorative pattern. Apply a layer of adhesive to the table surface and carefully position the mosaic pieces. Allow the adhesive to dry completely. Apply grout to fill the gaps between the mosaic pieces. Wipe away any excess grout. Seal the mosaic surface with a grout sealer to protect it from moisture. This technique results in a durable and visually stunning end table.
Stenciling: Using stencils allows for the application of intricate patterns and designs onto the surface of the round end table. Secure the stencil in place and apply paint or stain using a stencil brush or sponge. Remove the stencil carefully to reveal the design. This technique is ideal for adding subtle decorative details or creating bold graphic patterns. The range of available stencil designs is extensive, offering options to suit a wide variety of styles.
Wood Burning (Pyrography): For those with artistic flair and steady hands, wood burning offers a unique way to decorate a wooden round end table. Using a wood burning tool, carefully burn designs onto the wood surface. Practice on scrap wood before applying the technique to the finished table. This technique allows for the creation of intricate patterns, lettering, and personalized designs.
By exploring these DIY round end table ideas and incorporating personal creativity, it is possible to create a functional and aesthetically pleasing piece of furniture that reflects individual style and enhances the overall décor of any living space. The key is to carefully plan the project, select appropriate materials, and execute the construction and finishing techniques with precision and attention to detail.

35 Best Diy Side Table Ideas Plans End Tables Furniture
:max_bytes(150000):strip_icc()/deomesticblonde-4e0abc09e17f43449fe2ff1b7a2c4c10.jpg?strip=all "14 Diy End Table Plans")
14 Diy End Table Plans

Diy Round Side Table End Tables Apartment Decor Farmhouse Style Furniture

Diy Round Side Table Makeover My Creative Days

Diy Wood Circle Side Table Liz Marie Blog

Diy Round Coffee Table

Diy Round Side Table Makeover My Creative Days

Easy Diy Round End Table

Benchright Round End Tables Ana White

Build A Round Side Table Basic
Related Posts