How To Make A Small Coffee Table Out Of Wood
Crafting a small coffee table from wood is a rewarding project that allows you to create a unique and functional piece for your living room. With the right tools, materials, and instructions, even beginners can successfully build a sturdy and stylish table. This comprehensive guide will lead you through every step, from planning to finishing, ensuring you have a beautiful and durable coffee table to enjoy.
1. Planning and Design
Before you begin, carefully plan the dimensions and design of your coffee table. Consider the available space in your living room and the style you want to achieve. Here are some key factors to contemplate:
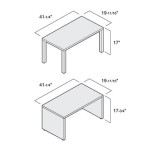
- Size: Measure the area where you want to place the table and choose dimensions that fit comfortably without obstructing traffic flow. A small coffee table typically measures around 24-36 inches in width and length.
- Shape: Rectangular, square, round, or oval? The shape of your table should complement the existing furniture in the room.
- Height: Opt for a height that is comfortable to reach when seated on a sofa or armchair, usually around 18-20 inches.
- Style: Consider the overall aesthetic of your living room, incorporating elements like rustic, modern, or minimalist styles into your table's design.
Once you have a clear vision, sketch out your design on paper, including detailed measurements and any special features. This will serve as your blueprint throughout the construction process.
2. Gathering Materials and Tools
The next step is to gather the necessary materials and tools. Here's a list of common items needed for a small coffee table project:
- Wood: Choose a sturdy hardwood like oak, maple, cherry, or walnut for durability and a beautiful finish. The thickness of the wood will depend on the table's design and the desired strength.
- Wood glue: A high-quality wood glue will ensure strong and lasting bonds between the table's components.
- Screws and nails: Select screws and nails that are appropriate for the thickness of your wood, ensuring a secure connection.
- Finishing supplies: Sandpaper in various grits (from coarse to fine), stain or paint, and finish (varnish, polyurethane, or oil) will give your table its final appearance.
- Tools: A saw (circular, table, or hand saw), drill, screwdriver, measuring tape, pencil, and a level are essential for accurate cutting, drilling, and assembly.
- Clamps: Clamps are crucial for securing the table's parts during gluing and construction.
Ensure you have all the materials and tools readily available before you begin construction.
3. Cutting and Assembling the Table
With your materials and tools gathered, you can start cutting the wood pieces according to your plans. Use a saw to precisely cut the tabletop, legs, and any additional components like rails or aprons. Be sure to make accurate measurements and double-check them before making each cut.
Once all the wood pieces are cut, carefully assemble the tabletop using wood glue and screws. Use clamps to hold the pieces together until the glue dries completely. If you are adding rails or aprons, attach them to the tabletop using the same methods.
Finally, attach the legs to the tabletop. Use screws to create a secure connection, ensuring that the legs are level and stable. You can also use a drill to pre-drill holes before driving the screws, preventing the wood from splitting.
4. Finishing Touches
After the table is assembled, it's time to give it a beautiful finish. Start by sanding the entire surface using sandpaper in increasing grits to achieve a smooth and even texture. Remove any dust and debris before applying stain or paint.
Stain or paint your table according to your chosen design and style. Apply multiple coats of stain or paint, allowing each coat to dry completely before applying the next.
Finally, apply a finish coat of varnish, polyurethane, or oil to protect your table from scratches, spills, and daily wear and tear. Apply multiple coats, allowing each coat to dry thoroughly before applying the next. Follow the manufacturer's instructions for drying time and best practices for application.
5. Safety Precautions
Remember to prioritize safety when working with wood and power tools. Always wear safety glasses, ear protection, and a dust mask to protect your eyes, ears, and lungs. Use clamps to secure wood while working, and avoid touching the cutting blade or moving parts of power tools.
Take your time and work carefully to prevent injury. If you are unfamiliar with any tool, consult the manufacturer's instructions or seek guidance from an experienced woodworker.

15 Free Diy Coffee Table Plans

Diy Simple Wood Slab Coffee Table Remodelaholic

Build An Outdoor Coffee Table With Castle Joints Diy Montreal

Diy Pallet Coffee Table Liz Marie Blog

More Like Home Simple Four Poster Coffee Table Plans Day 1

Diy Round Coffee Table

Angled Leg Coffee Table Free Diy Plans Rogue Engineer

More Like Home 2x4 Farmhouse Coffee Table Day 16

12 Diy Coffee Tables How To Make A Table

Diy Farmhouse Coffee Table Love Grows Wild
Related Posts