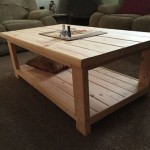
How to Paint a Coffee Table for a Rustic Wood Effect
Achieving a rustic wood effect on a coffee table is a popular do-it-yourself project that can transform a mundane piece of furniture into a captivating focal point. This technique simulates the appearance of aged and weathered wood, adding character and charm to any living space. The process involves layers of paint, strategic distressing, and optional glazing or waxing to create a convincing imitation of the natural aging process.
The following guide provides a comprehensive approach to painting a coffee table with a rustic wood effect, outlining the necessary materials, preparation steps, painting techniques, and finishing touches. The success of this project hinges on meticulous preparation, patient application, and a keen eye for detail.
Preparation: Laying the Groundwork for Success
Prior to commencing the painting process, thorough preparation is paramount. This stage ensures optimal paint adhesion, a smooth finish, and ultimately, a more authentic rustic appearance. The preparation steps typically involve cleaning, sanding, and priming the coffee table.
Cleaning: The initial step is to thoroughly clean the coffee table surface. This removes any dirt, dust, grease, or existing finishes that could impede paint adhesion. A mild detergent diluted in water is generally sufficient for cleaning. Use a soft cloth or sponge to wipe down the entire surface, paying particular attention to areas with ingrained dirt or stains. After washing, rinse the surface with clean water and allow it to dry completely. For stubborn stains, a specialized cleaner suitable for the existing finish may be necessary.
Sanding: Sanding is crucial for creating a textured surface that promotes paint adhesion and helps to create a rustic appearance. The grit of sandpaper required depends on the existing finish of the coffee table. For glossy finishes, a coarser grit sandpaper (around 80-120 grit) is recommended to break the surface and create a key for the primer to grip. For smoother surfaces, a finer grit sandpaper (around 150-220 grit) will suffice. Sand the entire surface of the coffee table evenly, following the grain of the wood if applicable. Pay attention to edges, corners, and any areas with existing imperfections. After sanding, remove all sanding dust with a clean cloth or vacuum cleaner. A tack cloth can be used to pick up any remaining dust particles.
Priming: Priming is an essential step that seals the wood surface, prevents tannin bleed-through (especially with woods like oak or mahogany), and provides a uniform base for the paint. Choose a primer specifically designed for furniture or wood. Apply the primer in thin, even coats using a brush, roller, or spray gun. Allow the primer to dry completely according to the manufacturer's instructions. Once dry, lightly sand the primed surface with a fine-grit sandpaper (around 220-320 grit) to smooth out any imperfections and create an even surface for the paint. Remove all sanding dust before proceeding.
Painting Techniques: Creating the Rustic Effect
The painting stage is where the rustic wood effect truly comes to life. This involves layering different colors of paint, employing techniques like dry brushing and color washing, and strategically distressing the finish to mimic the wear and tear of aged wood.
Base Coat: Choose a base coat color that complements the desired rustic aesthetic. Neutral colors like warm grays, creams, or light browns are often effective choices. Apply the base coat in thin, even layers using a brush, roller, or spray gun. Allowing each coat to dry completely before applying the next is crucial for a professional-looking finish. Typically, two coats of base paint are required to achieve full coverage and a consistent color.
Dry Brushing: Dry brushing is a technique that involves applying a small amount of paint to a brush, wiping off most of the paint onto a paper towel, and then lightly brushing the surface of the coffee table. This technique creates a textured, streaked effect that mimics the grain of wood. Choose a color that contrasts slightly with the base coat, such as a darker brown or a complementary color. Experiment with different brushstrokes and angles to achieve the desired texture. Apply the dry brushing selectively, focusing on areas where natural wear and tear would occur, such as edges, corners, and raised surfaces.
Color Washing: Color washing involves diluting paint with water and applying it to the surface of the coffee table in a thin, translucent layer. This technique adds depth and dimension to the finish and can be used to create a subtle aged effect. Choose a color that complements the base coat and dry brushing color. Mix the paint with water in a ratio of approximately 1:1 or 1:2, depending on the desired transparency. Apply the color wash using a brush or sponge, working it into the surface of the coffee table. Wipe off any excess paint with a clean cloth to control the intensity of the color. This technique is best used sparingly, focusing on areas where natural staining or discoloration would occur.
Distressing: Distressing is a key element in creating a rustic wood effect. This involves intentionally damaging the paint finish to reveal the underlying layers and simulate the wear and tear of aged wood. There are several methods for distressing paint, including sanding, using a putty knife, or using a chain or hammer. Sanding is a common and versatile technique that allows for controlled distressing. Use sandpaper of varying grits (from coarse to fine) to remove paint from areas where natural wear and tear would occur, such as edges, corners, raised surfaces, and around hardware. A putty knife can be used to chip away at the paint, creating areas of exposed wood or underlying paint layers. A chain or hammer can be used to create more aggressive distressing effects, such as dents, scratches, and gouges. Exercise caution when using these tools to avoid damaging the underlying wood. The key to successful distressing is to be strategic and deliberate, focusing on areas where natural wear and tear would occur. Avoid over-distressing, as this can detract from the overall aesthetic.
Finishing Touches: Enhancing and Protecting the Rustic Finish
The final stage involves applying a protective finish to seal the paint, enhance the rustic appearance, and protect the coffee table from wear and tear. Common finishing options include waxes, glazes, and sealants.
Waxing: Waxing adds a soft sheen to the painted surface and enhances the rustic appearance. Choose a wax specifically designed for furniture or painted surfaces. Apply the wax with a soft cloth, working it into the surface of the coffee table in a circular motion. Allow the wax to dry according to the manufacturer's instructions. Buff the waxed surface with a clean cloth to remove any excess wax and create a smooth, polished finish. Waxing also provides a degree of protection against moisture and scratches. A dark wax can be particularly effective in accentuating the distressed areas and adding depth to the finish. However, dark wax can be difficult to remove if applied too heavily, so it is best used sparingly and with caution.
Glazing: Glazing adds depth and dimension to the painted surface and can be used to highlight the distressed areas and accentuate the texture. Choose a glaze that complements the base coat and other paint colors. Apply the glaze with a brush or sponge, working it into the surface of the coffee table. Wipe off any excess glaze with a clean cloth to control the intensity of the color. Glazing is best used sparingly, focusing on areas where natural staining or discoloration would occur. A dark glaze can be particularly effective in highlighting the recessed areas and adding depth to the finish. However, dark glaze can be difficult to remove if applied too heavily, so it is best used sparingly and with caution.
Sealants: Sealants provide a durable and protective finish that is resistant to moisture, scratches, and stains. Choose a sealant specifically designed for furniture or painted surfaces. Apply the sealant in thin, even coats using a brush, roller, or spray gun. Allow each coat to dry completely before applying the next. Typically, two or three coats of sealant are required to provide adequate protection. Sealants are available in a variety of finishes, including matte, satin, and gloss. A matte or satin finish is often preferred for rustic furniture, as it provides a natural and understated look. A gloss finish can be used to add a touch of sheen, but it may detract from the rustic appearance.
By following these steps and employing these techniques, individuals can successfully transform a simple coffee table into a stunning piece of rustic furniture. The key is to be patient, meticulous, and creative, allowing the finish to evolve and develop over time. The final result will be a unique and personalized piece that adds character and charm to any living space.

Distressed Coffee Table A Revisit Rework The Painted Hive

How To Paint A Weathered Wood Finish On Furniture

How To Refinish A Table Farmhouse Style My 100 Year Old Home

Thrifted Oak Coffee Table Gets A New White Washed Finish

How To Distress Wood With White Paint Thistlewood Farm

Chalk Paint Coffee Table Makeover Step By Diy Guide Bricks N Blooms With Stacy Ling

3 Best Ways How To Distress Wood And Furniture With Paint Angela Marie Made

The Boho Coffee Table Milk Paint Experiment I Re Stuff

Farmhouse Coffee Table Makeover

How To Paint Your Coffee Table Notice The Little Things
Related Posts

