How To Paint Coffee Table Rustic Wooden Legs And Feet
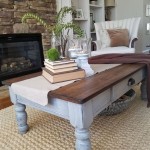
Painting the wooden legs and feet of a coffee table to achieve a rustic aesthetic is a popular DIY project that can dramatically transform the furniture's appearance. This process involves careful preparation, selection of appropriate materials, and the application of techniques that enhance the wood's natural grain and create a weathered, aged look. A successfully executed rustic finish will complement various interior design styles, adding character and a sense of history to the piece.
This article aims to provide a comprehensive guide on how to paint coffee table rustic wooden legs and feet, covering the essential steps from initial preparation to the final finishing touches. The instructions are applicable to various types of wooden legs and feet commonly found on coffee tables, though specific adjustments might be necessary depending on the wood species, existing finish, and desired level of rusticity.
Preparing the Coffee Table Legs and Feet
The initial stage of painting wooden legs and feet requires meticulous preparation to ensure proper adhesion of the paint and a uniform, aesthetically pleasing result. This primarily involves cleaning, sanding, and priming the wood surface. Ignoring these preliminary steps can lead to paint peeling, uneven coverage, and a less-than-desirable rustic appearance.
Begin by detaching the legs and feet from the coffee table if possible. This separation allows for easier and more complete access to all surfaces, drastically simplifying the painting process. If the legs are permanently attached, protect the surrounding tabletop with painter's tape and drop cloths to prevent unwanted paint splatters.
Cleaning is paramount. Use a mild detergent and water solution to thoroughly remove any dirt, grease, wax, or existing finishes from the wood. A scrub brush can be helpful for reaching crevices and corners. Rinse the wood with clean water and allow it to dry completely. Residual contaminants can interfere with paint adhesion and compromise the longevity of the finish.
Sanding is the next crucial step. Start with a medium-grit sandpaper (around 120-grit) to remove any existing glossy finishes or imperfections. Progress to a finer-grit sandpaper (around 220-grit) to smooth the surface. Sand in the direction of the wood grain to avoid creating unsightly scratches. The goal is to create a slightly roughened surface that will provide a good "tooth" for the primer to adhere to. After sanding, meticulously remove sanding dust with a tack cloth or a damp cloth. Dust particles can create bumps and imperfections in the final paint job.
Priming is highly recommended, particularly if the wood is bare or has undergone significant sanding. Primer seals the wood, prevents tannins from bleeding through the paint (especially with woods like oak or cherry), and provides a uniform surface for the topcoat. Choose a primer specifically designed for wood surfaces, and apply it according to the manufacturer's instructions. Allow the primer to dry completely before proceeding to the next step. Lightly sand the primed surface with fine-grit sandpaper to smooth out any imperfections before applying the paint.
Selecting Paint and Rustic Techniques
The choice of paint significantly influences the final rustic appearance of the coffee table legs and feet. Experimenting with different paint types and techniques is essential to achieve the desired level of weathering and character.
Chalk paint is a popular choice for creating a rustic finish due to its matte appearance and ease of distressing. It adheres well to most surfaces without requiring extensive preparation. Milk paint is another excellent option, offering a similarly matte finish and a slightly more authentic, historical look. It can be mixed from powder and provides a beautiful, chalky texture. Acrylic latex paint can also be used, but it typically requires more preparation and often has a slightly more modern appearance; however, it is more durable and easier to clean than chalk or milk paint.
Several techniques can be employed to create a rustic effect. Distressing, which involves intentionally removing paint in certain areas to reveal the underlying wood or primer, is a common method. This can be achieved using sandpaper, steel wool, or even a damp cloth to wipe away paint before it dries completely. Focus on areas that would naturally wear over time, such as edges, corners, and areas around hardware.
Dry brushing is another effective technique. Dip the tip of a dry brush into the paint, wipe off most of the paint onto a paper towel, and then lightly brush the surface with quick, uneven strokes. This creates a textured, streaky effect that mimics the look of aged wood. Layering different colors of paint can also add depth and complexity to the rustic finish. Apply a base coat of one color, let it dry, and then apply a second coat of a different color. Use distressing or dry brushing to reveal the underlying color in certain areas.
Consider using antiquing glaze or wax to further enhance the rustic appearance. These products are typically applied after the paint has dried and then wiped away, leaving a subtle tint in the crevices and details of the wood. This creates a sense of depth and age. Choose a glaze or wax that complements the paint colors and the overall aesthetic of the coffee table.
Experimentation is key. Practice these techniques on a scrap piece of wood before applying them to the coffee table legs and feet. This allows for fine-tuning the color combinations and distressing methods to achieve the desired results. Remember that a truly rustic finish should look natural and authentic, not forced or artificial.
Applying the Paint and Finishing Touches
Once the preparation is complete and the desired rustic techniques have been selected, applying the paint and adding the finishing touches are the final steps in transforming the coffee table legs and feet. This requires patience, attention to detail, and a careful approach to ensure a durable and aesthetically pleasing finish.
Apply the chosen paint in thin, even coats using a brush, roller, or spray gun. If using a brush, use high-quality synthetic brushes for latex and acrylic paints, and natural bristle brushes for oil-based paints. Applying thin coats prevents drips and runs, and ensures proper drying. Allow each coat to dry completely before applying the next. Multiple thin coats are generally preferable to one thick coat, as they provide better coverage and durability.
If implementing distressing techniques, now is the time to execute them. Sandpaper, steel wool, or a damp cloth can be used to remove paint from specific areas, revealing the underlying wood or primer. The amount of distressing depends on the desired level of rusticity. For a subtle effect, focus on lightly sanding edges and corners. For a more dramatic effect, remove larger areas of paint to expose the wood grain. Remember to remove sanding dust after distressing.
After distressing, apply antiquing glaze or wax if desired. Use a brush or cloth to apply the glaze or wax liberally, and then wipe away the excess with a clean cloth. Leave a small amount of glaze or wax in the crevices and details of the wood to enhance the aged appearance. Allow the glaze or wax to dry completely before proceeding to the next step.
To protect the painted finish and enhance its durability, apply a clear topcoat. Polyurethane is a durable and water-resistant option, suitable for surfaces that will be exposed to heavy use. Polyacrylic is another good choice, offering similar protection but with a less noticeable sheen. Water-based polyacrylic is generally preferred, as it dries quickly and has low VOCs (volatile organic compounds). Apply the topcoat in thin, even coats, following the manufacturer's instructions. Multiple coats may be necessary for optimal protection, sanding lightly with fine-grit sandpaper between coats. The type of topcoat should always be compatible with the paint you have selected.
Once the topcoat has dried completely, reattach the legs and feet to the coffee table. Inspect the finished product for any imperfections, and touch up any areas as needed. Allow the paint and topcoat to fully cure before placing items on the coffee table. This curing process typically takes several days or even weeks, depending on the specific products used.
By following these steps carefully, anyone can successfully paint coffee table rustic wooden legs and feet, adding character and charm to their furniture. The key is to take your time, pay attention to detail, and experiment with different techniques to achieve the desired aesthetic.

How To Refinish A Table Farmhouse Style My 100 Year Old Home

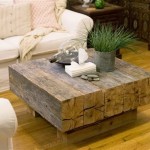
Diy Rustic Coffee Table From Reclaimed Wood Scavenger Chic

Corona Coffee Table Square Ana White

Diy Rustic Coffee Table From Reclaimed Wood Scavenger Chic

Rustic X Coffee Table Ana White

Farmhouse Coffee Table Makeover Unoriginal Mom

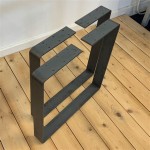
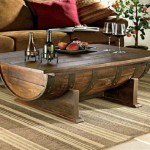
Diy Barade Coffee Table Where To Get Legs

Reclaimed Wood Coffee Table My Love 2 Create

Farmhouse Coffee Table Makeover Unoriginal Mom

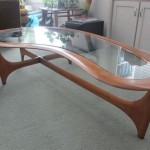
Claw Foot Coffee Table With Glass Top Painted White Black Antiquing Glaze Before And After Pictures Refinished By Kelly S Creations Https Www Facebook Com Pages Kellys Furniture 524028237619793
Related Posts