Essential Aspects of Simple Wood Table Plans
Tables, a ubiquitous piece of furniture, hold a prominent place in our homes, serving multiple purposes, from dining and crafting to decorative accents. Constructing a simple wood table from scratch may seem like a daunting task, but with careful planning and execution, it's an achievable endeavor. This guide delves into the essential aspects of simple wood table plans to empower you to create a functional and aesthetically pleasing piece that will enhance your living space.
1. Material Selection:
The type of wood you choose will significantly impact your table's durability, appearance, and overall character. For a beginner-friendly project, consider softwoods like pine or cedar, which are relatively easy to work with and affordable. If you desire a more robust table, hardwoods such as oak, maple, or walnut offer exceptional strength and durability. When selecting lumber, opt for straight-grained, knot-free boards to ensure a smooth and stable surface.
2. Table Dimensions and Design:
Before you dive into construction, determine the intended purpose and desired size of your table. Consider the available space in your room and the number of people you want to accommodate. Measure the length, width, and height you need. Sketch a simple design that includes the table's shape, legs, aprons, and any additional features like drawers or shelves. Keep in mind the proportions and balance of the design to ensure a visually appealing result.
3. Cutting and Assembly:
Using a miter saw or circular saw, cut the lumber according to your design. Double-check measurements to avoid mistakes. Start assembling the table by attaching the legs to the aprons, which are the horizontal supports that connect the legs. Use screws, nails, or dowels for secure joints. Align the pieces carefully and use clamps to hold them in place while you assemble them.
4. Tabletop Construction:
The tabletop can be made from a single wide plank or by joining multiple boards together. For a seamless appearance, consider using biscuit joiners or pocket hole screws to connect the boards. Sand the surface thoroughly to remove any splinters or rough edges and prepare it for finishing.
5. Finishing Touches:
To protect your table and enhance its appearance, apply a finish such as polyurethane, varnish, or stain. Choose a finish that complements the wood type and your desired aesthetic. Apply multiple coats, allowing each layer to dry completely before applying the next. After the final coat, allow the table to cure for the recommended time before putting it into use.
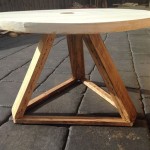
6. Customization and Variations:
Simple wood table plans provide a foundation for you to explore your creativity. Experiment with different leg styles, such as tapered legs, trestle legs, or pedestal legs. Add drawers or shelves to increase storage space. You can also incorporate decorative elements, such as carvings or inlay, to personalize your table. The possibilities are endless, allowing you to design a piece that perfectly matches your taste and home decor.
Conclusion:
With careful planning, precise execution, and a touch of creativity, you can construct a beautiful and functional simple wood table that will become a cherished part of your home. Embrace the process, and don't be afraid to seek assistance if needed. The satisfaction of building a piece of furniture with your own hands will make the effort worthwhile. So, gather your tools, select your wood, and embark on the rewarding journey of creating a unique statement piece that will grace your living space for years to come.

Build A Simple Reclaimed Wood Table Projects Furniture Diy

Pin On Ideas

How To Build A Simple Diy Workbench With 2x4 Lumber

More Like Home Simple Four Poster Coffee Table Plans Day 1

20 Gorgeous Diy Dining Table Ideas And Plans The House Of Wood

Simple Table Plans

Diy Table Projects Instructables

25 Diy Dining Tables Bob Vila

Simple Square Side Table Free Diy Plans Rogue Engineer Bedside Tables Woodworking Furniture

Coffee Table Plans
Related Posts